Monday, September 7, 2015

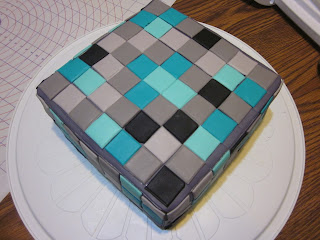
Minecraft Diamond Block Cake

Sorry about the long, long hiatus between entries. My family and friends stopped having a big demand for cake, and i wasn't volunteering, either. You know how life gets off track, life happens, maybe throw in some depression, and there you have it. Long time no see.

I look forward to making my littlest one's cake every year. She always asks for something different (no three years in a row of Princess cake for HER) and it's always something fun, and the bonus is she lets me have free reign for creativeness. 

This year she asked for a Minecraft cake. She is so into this game, and i love it. It's like interactive Legos on the screen, which seems more conducive to creativity than my shoot 'em up variety of game.

I looked around and found several ideas i liked. I really liked Viva La Cake's diamond block cake and i thought this was a little more different than the dirt/grass block i kept seeing everywhere. The colors are nice and i thought they looked like they'd be easy replicate, since coloring fondant is one of my biggest challenges sometimes.

I ordered the special fondant imprint mat that makes blocks from Amazon, using the link on Viva La Cake's blog there.

I wanted to do a special surprise inside the cake, so i also found this awesome YouTube video by My Cupcake Addiction to make a checkerboard pattern, which i had never done before.

And while i am linking things, in order to make a Steve figure to go on top of the cake, i half used this YouTube link and half used my fondant mat (which has 1 inch squares all over it so it makes it easy to eyeball your work).

I made two 9 inch square cakes using a white cake recipe and i tinted one teal, and one i tinted using a sky blue. Then i made two more 9 inch square cakes using a chocolate cake mix, and i darkened one using black, but i didn't end up using one of them, for reasons i will explain in a minute.

In the video i linked where she does the checkerboard cake, she uses 4 layers and each square she cuts out was 1 inch wide. I did not think my cake was going to hold up even after it had been in the freezer an hour to do that. I used toothpicks to outline where to cut on mine and i gave the middle section 1.5 inches and the outside section was 1 inch wide, and the outside section was what wanted to break on me. Thankfully icing was able to weld my cracks shut, but it was a problem. Maybe if i had 10 inch pans it would work better. It would look better her way, but i would have to freeze my cakes for longer than i did this time. In the video she says to freeze them for a half hour before cutting but i recommend much more. Either that or i need a sturdier cake recipe. I don't know how she did this with 8 inch cakes. Lots of practice, i guess.

Here are my cakes after they were outlined and cut.


It just happens that after i cut the tops off and level, they were all just about an inch tall. Which goes well with the measuring.

After i moved all the pieces around, they looked like this:


I rolled out a bunch of what turned out to be really purplish grey fondant for my base wall. This is where that problem with coloring fondant comes into play. But i wasn't concerned just yet, i knew this part would be hidden by all my pretty tiles and no one was going to be looking at it.


Now, i had to do some quick internet searching to figure out how to get the purple out of my grey. Turns out i needed to add some yellow color to tone down the blue. Nice! So i was able to churn out an uncounted number of perfectly grey squares along with my blue and teal.

To make the tiles stick better, i mixed some really dried out gum paste (it has really been a while since i made cakes) with some water to make a gum glue and i used a little paintbrush to dab on a little (not too much or you will have a mess on your hands) and i stuck them to the walls with no problems.


I need more practice smoothing fondant edges together but by this time it was almost one in the morning, and i just wanted to go to bed.

But i soldiered onward and put letters and it before i went to bed because i already had 100 other things to do the next day.

I don't have any good pictures of Steve by himself. I tried but my camera sucks on macro and my iPhone is about maxed out on memory. Which i am working on fixing. So here here is on the finished cake! He's my first fondant figure and i am pretty proud of him.


As for the inside of the cake, i probably should have arranged the layers better but they looked pretty awesome and they were delicious. Everyone really liked it, and no one complained about their vanilla and chocolate being in the same piece of cake.

Also, i think the only way to really enjoy the "checkerboard" part of the cake is to cut it right n the middle and expose it. Which is probably a good idea, because then you could push the outside pieces together and you won't get any stale ends. Hmm. See the things i think of after the fact? Ha.


Here is a photo from the very corner, where it looks good!


I already have a friend asking me to make one of these for her daughter's birthday!

I hope everyone is having a lovely and safe holiday today (it's Labor/Labour Day in the US and Canada)!


Monday, June 17, 2013

Thomas The Train Visits A Birthday Party!

I have been neglecting my blog a bit lately. My apologies. I had a LOT of stuff going on the last couple of months!

If you don't know by my infrequent postings, i am a home hobby baker. I am finding my way around cake decorating kind of like a blind person finds their way around an unfamiliar room. I just feel my way, learning as i go. Therefore, it's really exciting for me to see my cakes take form, and every success feels like a marathon with a photo finish.

Back in April, my nephew turned 5. He requested a Thomas the Train cake. My son loves Thomas back when he was a kid as well, so this was an exciting cake for me to take on. I had a kind of visual in my head, and my husband kind of gave his 2 cents, and i was off like a shot.

I knew i wanted there to be a tunnel. When i think of trains i think of tunnels into hillsides and long trestle bridges.

I baked a dome shaped cake in my Betty Crocker Bake N' Fill dome pan, and then i cut it in half for my hillside. Then i frosted it in a nice brown shade.


I used Royal icing for the tunnel details and the rails, brown sugar for dirt, and i piped some happy little trees using a star tip.


The toy i chose to use was a Happy Birthday Thomas the Train, and i took cues from how the train was decorated and piped colorful streamers of red, yellow, and blue in Royal icing for a festive border. Next time i would probably use buttercream icing instead because it was brittle and the kids at the party wanted to poke it, but it looked nice until they started messing with it.


My nephew was happy, and so was everyone else, because it was simply delicious!

Friday, March 15, 2013

Hello Kitty Birthday Cake

I made a cake last week for my friend and yoga teacher. Her daughter turned 6 and wanted a Hello Kitty cake.


I had the perfect idea in mind for the cake. I wanted to try and do an icing transfer! I keep trying new things, because i like to push myself to see what i can accomplish and this seemed like something i could manage.

I went to the store and found a very cute Hello Kitty coloring book. I planned out a 9" two-layer cake, so i found an image in the book that would fit. I took a cookie sheet and put the coloring page on it, already taped to the back of a sheet of freezer paper that i cut to fit. Then i taped both pages to the cookie tray so it wouldn't move around.

When i have seen transfers done on the internet, i have mostly seen buttercream icing transfers, but i wanted a glossy flat look for mine. So i made a batch of royal icing and i portioned out some icing of piping thickness into bowls and colored them black (for the eyes and whiskers), a bit of yellow (for her nose), some pink and blue (for her jumper and shirt), some red (for her bow), and i portioned out a good amount of plain white (for her body outline).

With my remaining icing, i added a bit of water to make some icing of a flooding consistency and colored portions as i did for the outlines.

This was nerve racking for me, honestly. I hadn't had time for a test on my method, and the flooding icing took ages to set. I was terrified she'd crack and i'd have to start over.

I let it sit overnight and went to bed with a bit of a prayer on my lips.

Now, when i do something for the first time, i always learn something important. In this cake, i learned that i CAN make this method work, but i originally imagined i'd use the side against the freezer paper as my "up side". But when i peeled the paper off of my transfer, i learned that it doesn't work quite that way. The paper side of the transfer wasn't perfect. There were a couple of air holes and it was far too flat and not very glossy and a little... grainy for lack of a better word.

So i had to improvise. I went ahead and laid her, flat and grainy side up, on the cake. I took my icing bags and piped my outline all over again and filled her in. I heaved a huge sigh of relief that that part was done and moved on.

I bought pre-made Wilton posies because i don't have the tools to really work with flowers yet (or any experience in making them for that matter) and arranged them on the cake.


I decided she would look really cute with stars around her, and so i used my freezer paper method and made some stars. I made 7 (the little girl was turning 6 and i wanted an extra one in case one broke) and my daughter poked her fingers in 2 of them when i wasn't in the room. So i placed 5 dried stars on the cake and i crossed my fingers and piped the bottom one directly on the cake. Stars are HARD.


It was a fairly simple design, but it certainly did turn out cute! My little one asked if i would make a cake just like this for HER birthday! She'll probably change her mind before August, but  maybe not.

You can't tell much in the photos, but there are tiny pink candy beads around the bottom of the cake. I need to learn to pipe shell designs. I'm hoping to take some Wilton classes this spring or summer, so i will have some actual training under my belt. Being a hobby baker is hard in the respect that you're constantly teaching yourself and crossing your fingers in hopes that your ideas will work. On the up side, every time i complete a cake, i feel very accomplished. And that's a pretty awesome feeling!

Saturday, January 26, 2013

Once Upon A Dream

One of my all-time favorite Disney movies is Sleeping Beauty. It's one of those movies that makes every little princess-loving little girl sigh with wistful wonder that someday their price will come.

Mind you, i have already informed my older daughter that if she does in fact have a prince waiting out there, she'll probably have to go rescue him from whatever dark forest he got lost in, but hey, not all princes are as perfect as our Shining Knight, Prince Phillip.

One of my friends asked me if i could make a cake for her little girl, who also adores Aurora. Of course i said yes!

I don't know about you, but my favorite scene in the movie is when Briar Rose strolls off into the forest to fetch berries while her "aunts" finish up her birthday preparations. It still gives me shivers. I love her voice, and the songs, and the owl who steals Prince Phillip's cloak... its wonderful.

That was the scene i wished to re-create with my cake.

I happened to find the most perfect Disney figurines, and i was all set.


"I'll love you at once, the way i did once upon a dream...."


My other figurines didn't really have a place on the cake, so i decided to have them hang around it instead. 

I'm also very proud of myself for learning (sort of) how to use my Left #107 tip for the flowery rosette borders. So far i haven't really gotten the hang of making any scalloped borders or anything. I used some Spring themed Wilton sprinkles for the fallen leaves of the forest, the daisies floating down the stream, and the wildflowers and butterflies (none of which i thought to get a good close photo of).

My friend said it was delicious and i know her daughter just loved it because i saw her face when i brought it over. It made my whole day!

Tuesday, January 1, 2013

Happy New Year!

Are you making any resolutions? I don't really have any personal resolutions to make, i think i'll stick to my standard resolution of wanting to end this new year a better and hopefully more enlightened person that i began. This year, i published my first blog content here after a looong time debating on it, and i also made a lot of cakes and garnered an enormous amount of experience along the way. I may gank a lot of ideas from here and there and yonder (and Pinterest), but i think we all do... but it's also good to take a recipe and do your own thing with it. Some people i know think baking is so hard but baking comes in two parts: Success and Failure. You have to be willing to fail to make anything worthwhile. If i have any wisdom to impart this year, that would be it. Don't be afraid of failure. It's okay to not meet your goals. It's not okay to give up. Giving up is the only real failure.

On a personal level, i began a journey into yoga and healing my body, mind, and spirit. Although i have only been at it a few months, i am gaining strength and more, and that makes me happy.

I have a lot of plans for the new year as my blog goes.

1. I really need to learn how to customize a layout on here. This hummingbird theme is cute, but when i look at other blogs there are so many amazing things happening and i want to learn to do some of them.

2. Bake more, and post more. I started out dedicating this blog to my cakes, but i don't make cakes often enough. I have months where i make 3 in a row, and months where i make none. So i am going to mix it up and add more content and learn more as i branch out more into other creations. I *love* to make candy, and i think i am going to share more of that here.

3. I want to do a theme post thing on my blog where i pick things from Pinterest and try them out. I would hardly be the first person on the internet doing that, but i have also found that my pins come out differently (sometimes for the better) than other Pinvestigators (i just coined that word, as far as i know). Also, if i do this, i can take the pressure off of myself, since i am ridiculously perfectionist. I need to do things where it's explicitly okay in my mind to make mistakes and fail if need be. Maybe i'll lighten up.

4. Enjoy myself more. I think i started taking myself way too seriously when i started posting to a blog. I have said it before, and i'll say it again for my own sake... i am not a professional, and therefore, it's OK if i screw up. I don't have many people around giving me really harsh criticism (thank goodness) so why am i so hard on myself?

So that's it in a nutshell for me. Thanks for taking the time out to come read my blog, and if you haven't already, follow me here on Blogspot, or find me on Facebook at Sugar On The Brain!

Happy New Year!

Love, Tracey AKA Sugar


Monday, December 31, 2012

The Tastiest Gift Of All

My oldest daughter turned a whopping *9* years old right before Christmas.

I honestly can't figure out where the time goes.

When i asked her what kind of birthday cake she wanted this year, she said "I want my cake to be a present, with a bow made out of fondant."

I told her i had never done a bow before. She said "I know! I am challenging you!"

Oh, boy. No more Cake Boss for her! See what i got myself into? A kid who wants to challenge mom's skills! Let's face it, each cake is a new experience anyhow, but she really went for one of those techniques that make me freak out on the inside.

I went onto YouTube and started watching some videos on making fondant bows. These ladies make it look so easy.

Turns out, they're not easy at all!

It might help if i had a ribbon cutter. But i don't. I thought it looked like something i could do freehand with my knife and a ruler. Then i came up with the idea to use the guides on my large fondant roller to help me out. I probably would have been better off with a stick ruler. Lesson learned.

I was kind of rushed, so i didn't do any pictures of the process. I had 5 kids under the age of 9 in my house all weekend, the youngest being not even 2, so i skipped all that.

I was semi-pleased with my result. I am a big perfectionist, and the bow was driving me insane. I should have stayed up extra late cutting ribbon pieces to dry overnight instead of assuming a couple of hours dry time would be enough.

It's difficult to see in the photos but i used lustre dust (in gold) all over the cake with a dry brush. I didn't brush the bow loops because they were already wanting to sink and i didn't want to encourage them. The whole cake glittered and it was a really lovely effect, and much nicer than plain matte teal.

I definitely think i could improve a lot of things on my next attempt at bows, but that's what i am all about. You have to try it in order to learn.

I have some new tools to add to my wish list, and a new cake under my belt, and my daughter was happy, and my kids being happy on their birthdays makes every cake i make for them a success!

Ta-Da!


I was still cranky about the bow but i did the best i could, and for my first attempt, i think it was decent enough.

I also hope it's awhile before i need to do another one. I need to practice.

Monday, December 17, 2012

Mexican Hot Chocolate Cookies

My Mother-in-law wanted to move up Christmas this year.

Yes, the whole end-of-the-world thing.

Being the good DIL i am, and for a dreamer, rather grounded in reality, i had to poke a little fun at her. It's my job, right? Keep everyone real. Because, honestly, i prefer my flights of fancy as solo trips, or at least i want to bring a good friend with a good sense of humour along.

Originally, i had a whole menu of desserts and appetizers planned. But as the family dinner approached, i lost steam. Part of it might have been guilt. Because i love my MIL and would never hurt her feelings on purpose. To be fair, i ran the idea past her first. I asked her how she felt about it, and she didn't seem to care, but she wondered if anyone would have the appetite for all that after a big Christmas dinner. I also figured this into my plans and i decided that it was a bit overkill, but i had to do something, because it's not every day your family holiday gatherings get moved around for possible cosmic calamity.

Martha always has some good ideas. My Google-fu skills take me to her page quite often. She intrigues me and makes me try new things. She's like my crack dealer, but my crack comes in the form of recipes and food and decor tricks.

Mexican Hot Chocolate Cookies (From Martha Stewart)


  • 2 1/4 cups all-purpose flour
  • 1/2 cup unsweetened cocoa powder
  • 2 teaspoons cream of tartar
  • 1 teaspoon baking soda
  • 1/2 teaspoon coarse salt
  • 1 cup (2 sticks) unsalted butter, room temperature
  • 1 3/4 cups sugar
  • 2 large eggs
  • 2 teaspoons cinnamon
  • 1/2 teaspoon chile powder (optional)

  • Preheat oven to 400 degrees, with racks in upper and lower thirds. In a medium bowl, sift together flour, cocoa powder, cream of tartar, baking soda, and salt. In a large bowl, using an electric mixer, beat butter and 1 1/2 cups sugar on medium speed until light and fluffy, about 2 minutes. Scrape down side of bowl. Add eggs and beat to combine. With mixer on low, gradually add flour mixture and beat until combined.
  • In a small bowl, combine remaining 1/4 cup sugar, cinnamon, and chile powder (if using). Using heaping tablespoons, form balls of dough and roll in cinnamon-sugar mixture. Place, about 3 inches apart, on two parchment-lined baking sheets. Bake until cookies are set in center and begin to crack, about 10 minutes, rotating sheets halfway through. Let cookies cool on sheets on wire racks 5 minutes, then transfer cookies to racks to cool completely. (Store in an airtight container, up to 1 week.)


(Note: I used ground Chipotle powder as the chile pepper for my cookies, because i was trying to be Mayan-authentic. You can probably use whatever chile powder floats your boat, but this has a nice heat to it without being an overpowering taste.)

Just roll your cookie dough around and get it coated.


They are very similar to Crackle cookies, and were firm. I let them cool on the tray for a couple minute and them removed them to a rack to cool the rest of the way.


Even though my MIL didn't think she'd like them, she asked me to leave her a bag of them when we left.

I also made a batch of Alton Brown's hot cocoa mix. I brought a canister with me so i could have a little hot cocoa bar. I kind of made i up as i went along with what i had in my kitchen. I brought marshmallows (of course), whipped cream (in a can), peppermint and vanilla extracts, Christmas nonpariel sprinkles, ground chipotle pepper, candy canes, and Hershey's chocolate syrup.

My cocoa pictures aren't the greatest, because for some reason i was trying to take pictures on my phone instead of my camera. But it was delicious, no matter how you chose to have it.


This one you can see that we were decadent and had marshmallows under the whipped cream, which was interesting. The girls had to have sprinkles, of course.


My husband went for the more exotic cocoa sprinkled with chipotle powder drizzled with chocolate syrup. Yum!

Me personally, i added a few drops of vanilla extract, added a few marshmallows and a dollop of whipped cream, plus sprinkles.

I have a cute idea for a Hot Cocoa bar for Christmas, when things are going to be quiet and we can spend all day in our jammies playing with presents. The kids will love it, and maybe we'll make the adult cocoa Irish.

Hopefully it helped take the weird out of having Christmas almost 2 weeks early at Grandma's house.

I hope to have more posts coming soon as i complete more of my Holiday treats list.