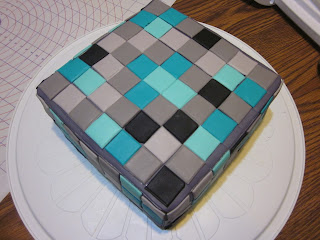
I look forward to making my littlest one's cake every year. She always asks for something different (no three years in a row of Princess cake for HER) and it's always something fun, and the bonus is she lets me have free reign for creativeness.
This year she asked for a Minecraft cake. She is so into this game, and i love it. It's like interactive Legos on the screen, which seems more conducive to creativity than my shoot 'em up variety of game.
I looked around and found several ideas i liked. I really liked Viva La Cake's diamond block cake and i thought this was a little more different than the dirt/grass block i kept seeing everywhere. The colors are nice and i thought they looked like they'd be easy replicate, since coloring fondant is one of my biggest challenges sometimes.
I ordered the special fondant imprint mat that makes blocks from Amazon, using the link on Viva La Cake's blog there.
I wanted to do a special surprise inside the cake, so i also found this awesome YouTube video by My Cupcake Addiction to make a checkerboard pattern, which i had never done before.
And while i am linking things, in order to make a Steve figure to go on top of the cake, i half used this YouTube link and half used my fondant mat (which has 1 inch squares all over it so it makes it easy to eyeball your work).
I made two 9 inch square cakes using a white cake recipe and i tinted one teal, and one i tinted using a sky blue. Then i made two more 9 inch square cakes using a chocolate cake mix, and i darkened one using black, but i didn't end up using one of them, for reasons i will explain in a minute.
In the video i linked where she does the checkerboard cake, she uses 4 layers and each square she cuts out was 1 inch wide. I did not think my cake was going to hold up even after it had been in the freezer an hour to do that. I used toothpicks to outline where to cut on mine and i gave the middle section 1.5 inches and the outside section was 1 inch wide, and the outside section was what wanted to break on me. Thankfully icing was able to weld my cracks shut, but it was a problem. Maybe if i had 10 inch pans it would work better. It would look better her way, but i would have to freeze my cakes for longer than i did this time. In the video she says to freeze them for a half hour before cutting but i recommend much more. Either that or i need a sturdier cake recipe. I don't know how she did this with 8 inch cakes. Lots of practice, i guess.
Here are my cakes after they were outlined and cut.
It just happens that after i cut the tops off and level, they were all just about an inch tall. Which goes well with the measuring.
After i moved all the pieces around, they looked like this:
I rolled out a bunch of what turned out to be really purplish grey fondant for my base wall. This is where that problem with coloring fondant comes into play. But i wasn't concerned just yet, i knew this part would be hidden by all my pretty tiles and no one was going to be looking at it.
Now, i had to do some quick internet searching to figure out how to get the purple out of my grey. Turns out i needed to add some yellow color to tone down the blue. Nice! So i was able to churn out an uncounted number of perfectly grey squares along with my blue and teal.
To make the tiles stick better, i mixed some really dried out gum paste (it has really been a while since i made cakes) with some water to make a gum glue and i used a little paintbrush to dab on a little (not too much or you will have a mess on your hands) and i stuck them to the walls with no problems.
I need more practice smoothing fondant edges together but by this time it was almost one in the morning, and i just wanted to go to bed.
But i soldiered onward and put letters and it before i went to bed because i already had 100 other things to do the next day.
I don't have any good pictures of Steve by himself. I tried but my camera sucks on macro and my iPhone is about maxed out on memory. Which i am working on fixing. So here here is on the finished cake! He's my first fondant figure and i am pretty proud of him.
As for the inside of the cake, i probably should have arranged the layers better but they looked pretty awesome and they were delicious. Everyone really liked it, and no one complained about their vanilla and chocolate being in the same piece of cake.
Also, i think the only way to really enjoy the "checkerboard" part of the cake is to cut it right n the middle and expose it. Which is probably a good idea, because then you could push the outside pieces together and you won't get any stale ends. Hmm. See the things i think of after the fact? Ha.
Here is a photo from the very corner, where it looks good!
I already have a friend asking me to make one of these for her daughter's birthday!
I hope everyone is having a lovely and safe holiday today (it's Labor/Labour Day in the US and Canada)!


